

A Guide to Git, GitHub, and How to Use Them Together
Mastering Git and GitHub: A Comprehensive Guide to Version Control and Collaboration

Hello! I'm Mayank Aggarwal a B.Tech Student. As a dedicated tech enthusiast and blogger, I'm excited to welcome you to my corner of the internet. I am A backend Developer. I am Working on My DSA Skills. Now preparing for Interviews.
Introduction
In the world of software development, version control is an essential tool. It allows developers to track changes, collaborate efficiently, and manage codebase history. Git and GitHub are two of the most popular tools for version control and collaboration, respectively. In this comprehensive guide, we will explore what Git and GitHub are, how they work, and how to use GitHub with Git, accompanied by practical examples.
What is Git?
Git is a distributed version control system designed to handle everything from small to large projects with speed and efficiency. It was created by Linus Torvalds in 2005 and has since become the industry standard for version control. Git allows developers to track changes in their codebase, collaborate with others, and easily manage different versions of their projects.
Key Concepts in Git:
Repository (Repo): A Git repository is a directory or folder that contains all the files and history of your project. It serves as a centralized location where your codebase is stored.
Commit: A commit is a snapshot of your code at a specific point in time. It represents a set of changes you've made to the code. Each commit has a unique identifier called a SHA-1 hash.
Branch: A branch in Git is a separate line of development. It allows you to work on new features or bug fixes without affecting the main codebase. Branches can be merged back into the main branch when ready.
Pull Request (PR): A pull request is a feature in Git-based collaboration platforms like GitHub, which allows developers to propose changes to a project. Other developers can review and discuss the changes before merging them.
Clone: Cloning a repository means making a copy of it on your local machine. This copy includes the entire project history.
What is GitHub?
GitHub is a web-based platform built on top of Git. It provides a wide range of features to help developers collaborate, manage, and host their Git repositories. GitHub is widely used for open-source and private software projects, making it a hub for developers worldwide.
Key Features of GitHub:
Remote Repositories: GitHub hosts Git repositories in the cloud, making it easy to access and collaborate on projects from anywhere.
Collaboration Tools: GitHub provides tools for code review, issue tracking, and project management. Developers can work together seamlessly.
Forks and Pull Requests: Developers can fork (create a copy of) a repository, make changes, and then submit a pull request to propose their changes for inclusion in the original project.
Issues: Developers can report and track issues, bugs, and feature requests within a repository.
Wikis and Documentation: GitHub offers wiki pages and a built-in documentation system to help developers document their projects.
Now that we understand the basics of Git and GitHub, let's explore how to use GitHub with Git, using practical examples.
Using GitHub with Cmd(Git) - Step by Step
Step 1: Create a GitHub Account
If you don't already have one, go to GitHub and create a free account. Once you have an account, you can create and manage your repositories.
Step 2: Install Git
If you haven't already installed Git on your local machine, download and install it from the official Git website. After installation, open your terminal or command prompt to start using Git.
Step 3: Configure Git
Before you start using Git, configure it with your username and email. Open your terminal or command prompt and run the following commands, replacing <YourName> and <YourEmail> with your actual name and email:
git config --global user.name "<YourName>"
git config --global user.email "<YourEmail>"
Step 4: Create a New Repository on GitHub
Log in to your GitHub account.
Click the
+icon in the top right corner of the GitHub homepage and select "New Repository."Follow the instructions to create a new repository, giving it a name (e.g.,
your-repo) and optionally a description.Click "Create repository."
Step 5: Addin Your files on GitHub
Step 1: Clone a Repository
To work with a GitHub repository using the command line, start by cloning it to your local machine. Replace <repository_url> with the actual URL of the repository you want to clone.
This is the HTTPS URL present on GitHub.
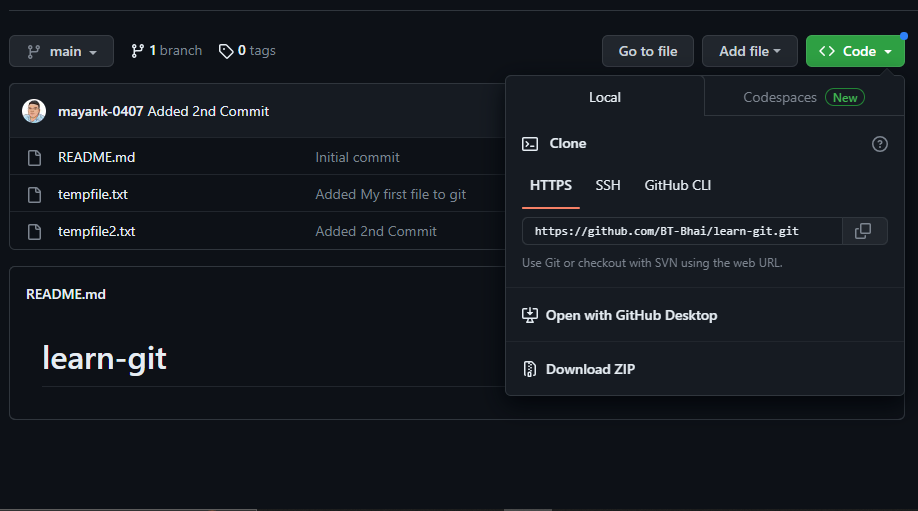
git clone <repository_url>
Example:
git clone https://github.com/yourusername/your-repo.git
This command will create a copy of the repository on your computer.
Step 2: Navigate to the Repository
Use the cd command to navigate to the repository's directory.
cd your-repo
Step 3: Make Changes
Now you can make changes to your project files.
These changes can be creating a file(test file for the first time) or any project, But make sure that you don't add any confidential Keys to it.
After making changes, you need to stage and commit your changes.
Step 4: Stage Changes
To stage your changes for commit, use the following command. Replace <file_name> with the name of the file you want to stage or use . to stage all changes.
Here . means all the files that are there in the folder.
git add <file_name>
Example:
git add index.html
Step 5: Commit Changes
Commit your staged changes with a descriptive message using the commit command.
git commit -m "Your descriptive commit message here"
Example:
git commit -m "Updated homepage"
Step 6: Push Changes to GitHub
To push your committed changes to the GitHub repository, use the push command.
git push origin master
This command pushes your changes to the master branch on GitHub. If you're working on a different branch, replace master with the branch name.
Example:
git push origin main
Step 7: Pull Changes from GitHub
To update your local repository with changes from the GitHub repository, use the pull command.
git pull origin master
This command pulls changes from the master branch on GitHub to your local repository.
Example:
git pull origin main
Step 8: Create a New Branch
If you want to work on a new feature or bug fix, it's a good practice to create a new branch. Use the following command to create a new branch and switch to it.
git checkout -b new-feature
git checkout -M new1-feature   // to rename branch
Step 9: Switch Between Branches
To switch between branches, use the checkout command.
git checkout branch-name
git checkout -d branch-name  // to delete branch
Example:
git checkout main
Step 10: Merge Changes
After making changes on a branch, you can merge them back into the master (or another) branch.
git checkout master
git merge branch-name
Example:
git checkout main
git merge new-feature
Or You can Open your GitHub and Create a PR from your GitHub.
How to Revert Changes in Github?
Mistakes happen in software development, and sometimes, you may find yourself needing to undo a commit in your Git repository. Whether it's due to a bug introduced or changes that shouldn't have been made, Git provides a powerful feature called "revert" to help you undo commits without rewriting history. In this blog post, we'll walk you through the process of reverting a commit using the command line, providing step-by-step instructions and examples.
Step 1: Identify the Commit to Revert
The first step is to identify the commit that you want to revert. You can use the git log command to view a list of commits along with their commit IDs (hashes). Find the commit you wish to undo, and note its commit ID.
git log
Step 2: Revert the Commit
To revert a commit, use the git revert command followed by the commit ID you want to undo. This creates a new commit that undoes the changes introduced by the specified commit.
git revert <commit_id>
Example:
git revert abc123
This command will open a text editor for you to enter a commit message describing the revert. Save and exit the text editor to create the revert commit.
Step 3: Push the Revert Commit
After you've created the revert commit, you need to push it to the remote repository if you're collaborating with others.
git push -f
Replace master with the name of your branch if you're working on a different branch.
Step 4: Verify the Revert
It's essential to test the changes made by the revert commit to ensure that they resolve the issues you intended to fix. Verify that the commit you wanted to revert no longer has its changes, and the codebase is functioning as expected.
Additional Tips
Reverting Multiple Commits
If you need to revert multiple commits, you can specify a range of commits by using the following command:
git revert <start_commit_id>^..<end_commit_id>
Example:
git revert abc123^..def456
Reverting a Merge Commit
Reverting a merge commit can be slightly more complex. You can use the -m option to specify the parent number when reverting a merge commit. For example, to revert the second parent of a merge commit:
git revert -m 2 <merge_commit_id>
Conclusion
Git and GitHub are indispensable tools for modern software development. Git helps you manage your codebase locally, while GitHub provides a platform for collaboration, code sharing, and project management. By following the steps outlined in this guide and practicing


